|
OPGI Manufacturing News:
Product: 1970-72 Chevelle Wheel Opening Moldings
Product Code: WMK97C (Full Discounted Set)
$109.95 complete
Now In Stock! Finally, after 2+ years of R & D, and with your
valuable input, we’re pleased to announce the arrival
of 100% original design wheel opening
moldings. Why compromise? Factory correct extruded contour
and width guarantees an edge at car shows where everything
must be precisely matched to the GM factory originals. These
have been produced the right way, with new stamped forms (not
stretch dies) and premium chrome anodizing, insuring a perfectly
simple install. Can be purchased separately (see website or
catalog), or in a complete, convenient discounted kit.
ORDER NOW >>
|
 |
|
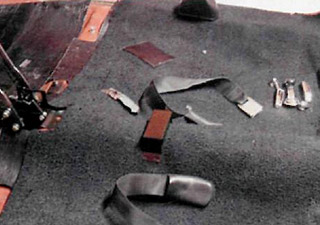
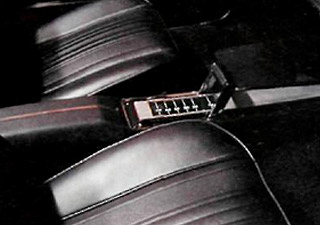
Get A Grip
Put the shifter
where it belongs with a
column-to-floor-shift conversion.
By Jefferson Bryant / Photography by Jefferson Bryant
The classic musclecar horseshoe-style shifter not only looks
good, but brings a certain racy flavor to driving. grabbing
that handle and slinging it back to first for a little self-shifting,
burn-out inducing fun is a mandatory practice for owners of
classic muscle cars.
|
|
Doing the same thing with a column shifter is, well, a little weird.
It just doesn't have the same adrenaline-inducing machismo that
comes with a floor shifter. It actually puts your body in an
odd position, all hunched up, shoulders tense, as you carefully
move to the next gear hoping you don't miss and go to third
or, worse, neutral or reverse.
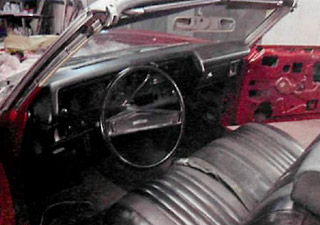
But what are you going to do about it? If your ride is a GM
product, then Original Parts Group has the answer
for you — convert it from a column to floor shift.
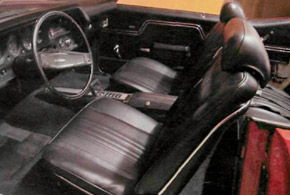
If your plans for a floor shift conversion include a factory
console, then you must also have bucket seats. We recently covered
the process of converting a 1970 Chevelle to bucket seats (see
Musclecar Enthusiast, December 2008). While we were at it, we
swapped the column shifter for a floor shift and console. You
could simply install an aftermarket shifter, but those don't
have the same feel or look as the factory unit.
Installing a factory console requires that you have one. Original
Parts Group sells all the necessary parts for this conversion,
right down to the screws that are used to assemble the console.
With the right parts, the job is fairly simple. One area that
gets a little tricky is the column itself. There are a few options
when it comes to the column. The most obvious is to replace
the column with either a factory or aftermarket non-shift column.
For those who want to retain the original column, all is not
lost. The shift lever can simply be removed and the small stub
left in place, or you can modify the original column to make
it smooth.
Smoothing the column requires the shifter stub to be sawed off.
It may be a little scary to start sawing on the column, but
it's not that big of a deal. Once the stub is removed, any remaining
stub is ground off and the remaining hole is filled with either
Duraglass (a fiberglass reinforced body filler) or better yet,
Magnum Steel.
Magnum Steel is a steel-reinforced epoxy putty that is available
at any auto parts store. The putty mixes by hand and is pressed
into place. Once the putty cures, it is sanded smooth and painted.
The one major issue with modifying the column is that the shifter
ring on the column can still rotate, if it is not locked. This
can cause the ignition switch to lock. Not a big problem as
long as you are the one driving, but if anybody else ever drives
your car and it gets locked, it is sure to cause some frustration,
so keep that in mind when you are making your decision.
In all, the total conversion took about a day. The team at Red
Line Auto Sports let us spend the day at their shop in Wilson,
Oklahoma, and watch as they tossed the column shift and put
it on the floor where it should be.
There are a few options when it comes to the column.
The most obvious is to replace the column with either a factory
or aftermarket non-shift column. For those who want to retain
the original column, all is not lost.
|
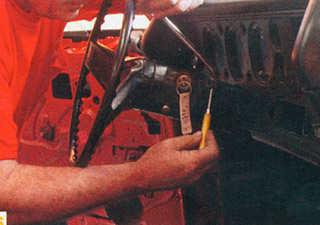
1. A BETTER WAY
A column shifter does what it was designed to do, but is no good for a little stoplight-to-stoplight action. For this 70 Chevelle convertible, it had to go.
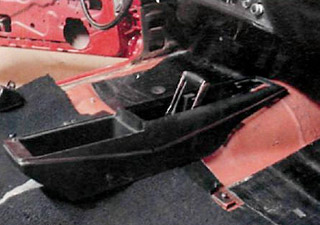
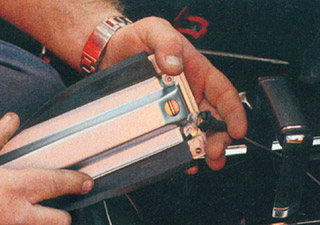
2. SPOT ON
With the bench seat tossed and a set of buckets ready for the floor, the shifter was placed on the floor and the new console from OPG was placed over it. This is to align the shifter where it needs to be. The floor does not have any shifter location marks,
so you have to line it up where it fits best.
3. LINING UP
The rear mount for the console bolts to the floor, and must be lined up with the console as well.
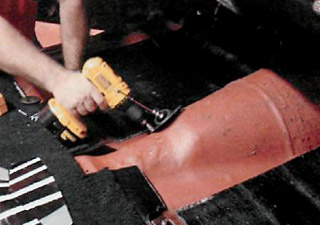
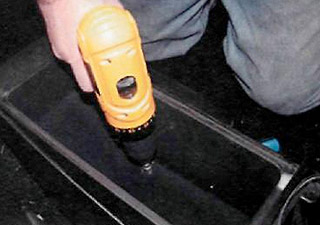
4. HOLE IN ONE
There is a dimple for the shifter cable though, which was drilled with a start bit, then a step drill was used to open up the hole.
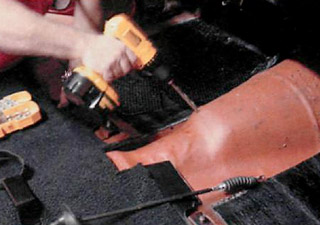
5. GIVE IT THE BOOT
The boot on the end of the shifter goes under the car.
 6.
SEAL THE DEAL
Then the rubber grommet was screwed in using some self-tapping screws. Be careful here, as the rubber will tear if you tighten it down too far.
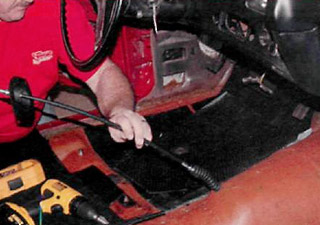
 7.
QUIET, PLEASE
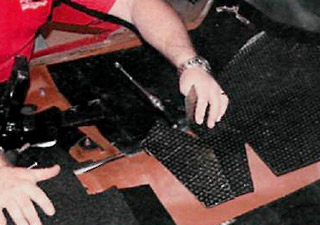
We replaced the sound deadener pad as well, so it went on after the shifter cable and the section that covered the cable was trimmed away.
8. NIP, TUCK
The section of carpet where the rear console mount goes was trimmed away. The jute padding is really difficult to cut; most of it gets pulled out.
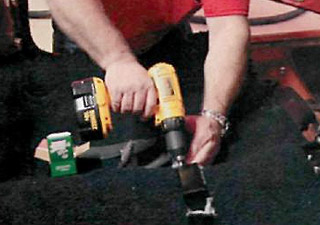
9. TIME TO MOUNT UP
Then the mount was screwed into place.
10. SHIFT READY
Next, the shifter itself was bolted in place, again using self-tapping screws.

11. ORIENTATION
The shift indicator plate only be installed one way, as shown by the angle cut on the plexiglass plate.
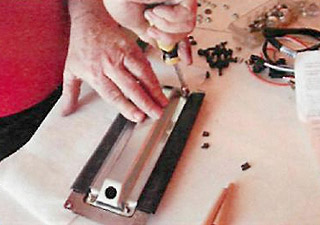
12. SOME ASSEMBLY REQUIRED
Since we used a brand new console from OPG, we had to assemble all of the components. Here, the shift indicator/shifter leg sweep assembly is put together. Don't tighten the stamped-steel nuts too tight, as the legs will break.
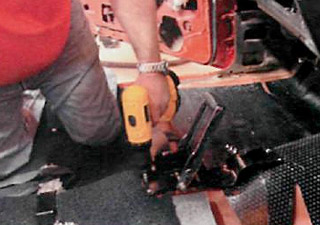
13. PLACES EVERYONE
The console bolts into place with two screws in the front
of the shifter base and two screws in the front of the shifter.
14. BOLTING DOWN
Two screws were driven into the rear console mount
through the console storage area.
15. POWERING UP
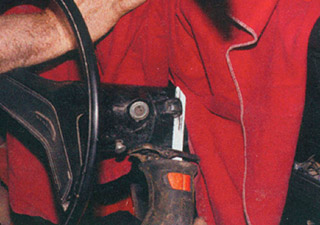
The console also had to be wired. We used a wiring harness from OPG which has all the necessary plugs to interface withthe factory wiring. The shift indicator assembly
has twolights that plug in.
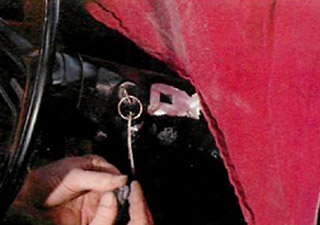
16. ON RETAINER
Using a small punch, the column shift retainer pin was pushed out. Then the shift lever was removed. We opted to show you how the column can be modified, as replacing the
column is a matter of a couple bolts.
17. A CLOSE SHAVE
We used a sawz-all to trim off the shift lever tab. We used a blanket to protect the gauges.
18. SMOOTH SAILING
Using a die-grinder with a sanding disc, the columnwas cleaned up until it was smooth.
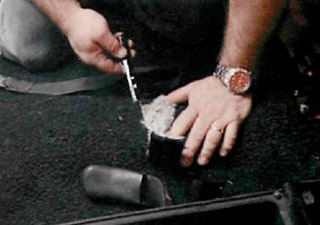
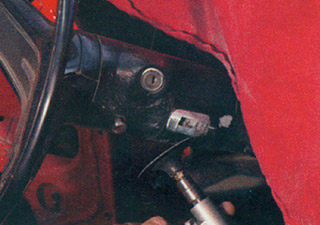
19.FILLING IN THE GAP
We mixed up a little Magnum Steel and pressed it into the
hole in the column. If you push enough into the hole, it will
become locked and the column ring won't rotate. Make sure
the key is in the "on" position; you do not want
the column in the "locked" position.
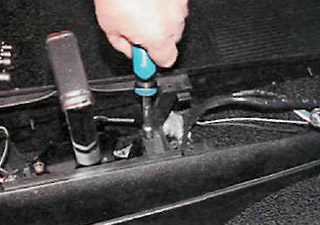
20. SECURING THE CONNECTION
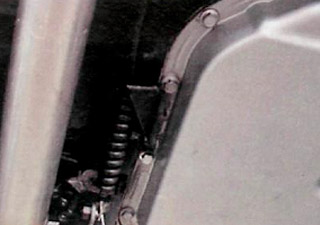
Underneath the car, the shift cable was attached to the shift arm on the tranny. The cable bracket bolts to the tranny pan.
21. A NEW LOOK
All done. With the new bucketseats, the interior now looks like a musclecarshould.
|
SOURCES
|
|
MUSCLECAR ENTHUSIAST
click here
RED LINE AUTO SPORTS
21180 US hwy. 70 West, Wilson, OK 73463
(800)580-9299 - www.redlinemusclecars.com
ORIGINAL PARTS GROUP
1770 Saturn Way, Seal Beach, CA 90740
(800)243-8355 - www.opgi.com
|
|
|
|
Distributor Tuning with MSD
Your engine’s distributor does a lot more than simply
distribute sparks to the right spark plug at the exact moment,
which is quite a feat in itself really. Along with this spark
distribution it also has the responsibility of triggering the
ignition. Whether this trigger signal comes from a set of breaker
points opening or an electronic amplifier or magnetic pickup
depends on what type of distributor you have. One more function
the distributor provides is an ignition curve through a mechanical
advance assembly (pre-computer controlled days) which aids in
the overall performance of your engine.
One timing setting is not ideal for the variety of rpm an engine
runs through. As rpm increases, the engine requires different
ignition timing due to a number of changes such as the dynamics
of the air/fuel mixture entering the cylinder or the reduction
in time that the mixture has to completely combust and burn.
MSD Pro-Billet Distributors feature a mechanical advance assembly
that lets you easily tune it to meet your engine’s specifications.
This assembly is always mounted on top of the distributor shaft
for quick access to make adjustments easy. The advance assembly
is made up of precision weights, springs and a stop bushing
to limit the amount of advance. As rpm increases the weights
are pushed outward by centrifugal force. (MSD added nylon pads
to ensure smooth movement of the weights.) The advance plate
is attached to the reluctor assembly which triggers the magnetic
pickup. As the weights push out, the reluctor moves forward
resulting in triggering the magnetic pickup sooner resulting
in advancing the timing. Also note that the rotor is attached
to the advance plate so rotor phasing is not affected.
To control how quickly the weights are pushed out, MSD supplies
each distributor with three pairs of advance springs. These
springs hold the weights in until a point when the centrifugal
force overcomes the spring tension, which controls the slope
of the advance curve. Heavy springs with higher tension slow
the rate of advance while the lightweight springs allow the
timing to advance rapidly with rpm.
The amount of mechanical advance that occurs is controlled by
a changeable stop bushing. These bushings feature different
diameters which limit the movement of the advance plate. MSD
includes four different advance stop bushings that will limit
the mechanical timing to an additional 18°, 21° 25°
and 28° (crankshaft).
When setting your timing remember that adjusting it at an idle
is only part of the job. The mechanical advance that you set
with your distributor will be added to this initial timing to
produce your total timing. For example, if you have 10°
initial, and have the 21° stop bushing installed in your
MSD distributor, the total timing will be 31°.
MSD offers a Ready-to-Run Distributor that produces a nice hot
spark to improve combustion and performance. The cool thing
for restorations is that this distributor does not require and
external ignition box, so they drop right in and you can retain
the stock appearance of the engine! You can even remove the
MSD red cap and install a points style window cap to be extra
stealthy!
Taking the time to tune your distributor’s advance will
be beneficial to your vehicle’s driveability. Timing may
not be everything, but it a big part of overall performance.
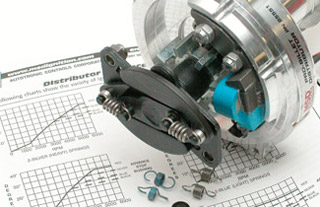
Mechanical Advance
MSD Pro-Billet Distributors feature an adjustable mechanical
advance assembly. The advance is always mounted on top of
the distributor so you never need to disassemble it to make
changes. By changing the supplied springs you can alter the
rate that the timing advances. Four different stop bushings
can be installed tocontrol the amount of advance.
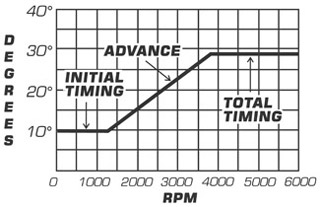
Timing Chart
This timing chart illustrates just a sample of the different
ignition curves that you can create with an MSD Pro-Billet
Distributor.
|
|