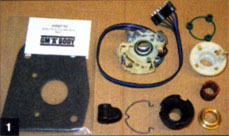
 1. Most of the necessary parts came in repro form from Original Parts Group, but Steering Column Pros of Covina, California, turned up a few hard-to-find items. With parts in hand, we were ready to go.
 2. Though our main objective was to restore turn-signal capabilities to our subject Malibu, the lower end of the steering column was also needy. The column adapter (arrow) was brittle and broken, and it had totally lost the lip that holds it in place on the column end.
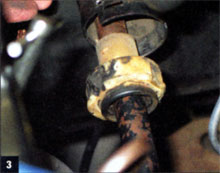 3. After removing the standard retaining clip, we ditched the improvised set screws and hose clamp that were actually holding that adapter in place. As you can see, this part was at the end of its useful life.
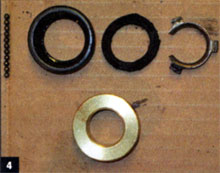 4. Though the lower adapter can’t be removed until the column comes off, we wanted to show you just how bad this part of the 1965’s column was. The adapter takes a bearing, which broke into pieces with just a bit of coaxing. Original Parts Group sells a solid bronze counterpart to replace this weak spot.
 5. Back in the passenger compartment, we removed the chrome center cap and went after the horn-button cap retainer, the retainer itself, and the steering-wheel bolt.
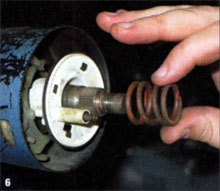 6. After removing the steering wheel with the appropriate puller, this spring and the signal-cancel cam (which also incorporates the horn contact on its backside) could be removed.
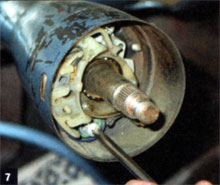 7. It quickly became obvious why our SS owner had become a hand-signal-only dude. The slot for the turn-signal lever in the original turn-signal switch was sown beyond use and the contacts had been soldered back into place at least once.
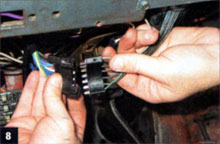 8. Before proceeding any further, we disconnected the battery and unplugged the steering-wheel harness. The gray wire at the top had to be unhooked from the harness. Inserting a very small screwdriver into the socket to unhook the wire worked well.
 9. After removing the lower column opening cover, the column support strap could be disconnected. This released the wire harness cover, freeing the wires to be pulled through the upper bowl portion of the column.
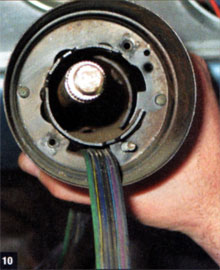 10. This bowl section has a slot for the wires and harness connector end to pass through; some turning and positioning was necessary to accomplish this.
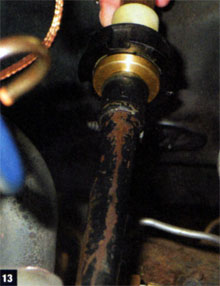
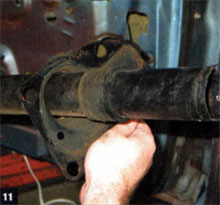 11. At this point the column firewall flange could be unbolted. With a little twisting, it came right past the pedals and out of the car. All the seals, as well as the column and flange, were showing their age, but everything cleaned up well.
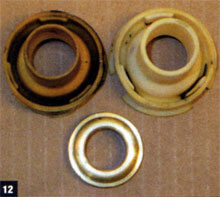 12. As far as we know, new or reproduction Malibu steering column adapters are not available. Luckily, Steering Column Pros found this one, which was an excellent improvement over the thrashed original. Besides the fact that the piece was cracked and brittle (note the lip around that outside of the replacement piece) this is how this piece should look. Goodbye, hose clamp!
 13. The adapter got a coat of high-heat black paint before our replacement bronze bushing upgrade was pressed into place. We slit the steering-shaft clamp into place inside the car, followed by the brushing/adapter combo. The retaining clip would be installed after the column was in its final position.
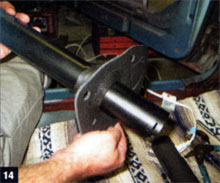 14. Some sandpaper, black paint, and a little OEM Malibu Blue rattle-can hue brought the pieces right back to life. The column/flange seal was cleaned up with Armor All and reused, and a new sponge seal on the column flange provided a nice, tight fit at the firewall. We then bolted the column back into place, using the column support strap to temporarily hold it in place.
 15. Early Chevelle (’64-’66) turn-signal switches come in two typed: the cast BPC unit on the left, and the mostly plastic guide unit on the right. There’s no rule of thumb to determine which type your column will take; whichever version came out, that’s what needs to go back in.
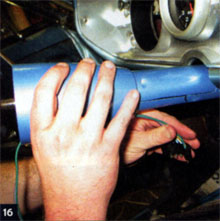 16. With that issue determined, we fed the wires of our BPC unit back through the bowl section of our column and began routing them down the column.
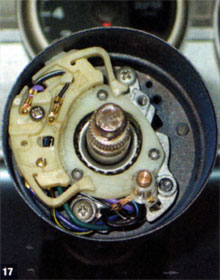 17. You’ll know when the BPC turn-signal switch is properly situated, thanks to the locating pin and two securing screws.
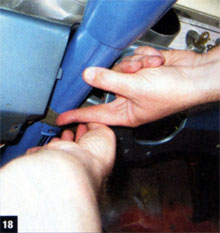 18. With the turn-signal switch in place, we temporarily removed the column support strap, routed the wires, and put the repainted wire cover plate into place before bolting the strap back up.
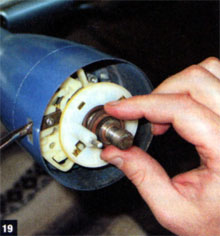 19. After the Malibu’s long-unused turn-signal lever was reattached, a new cancel cam went into place atop the new turn-signal switch, followed by the steering-wheel tension spring.
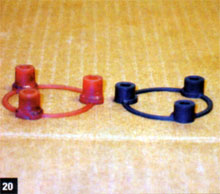 20. We did have one slight hitch, however. Our repro steering-wheel adapter’s legs were too short for the Malibu’s horn-button adapter and horn ring, which kept the horn from functioning properly.
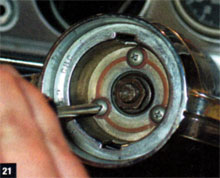 21. Although the original adapter was broken it could be reused, so we did just that. Be sure to check this out before trashing your original piece. If the repro height won’t work and the original item is too far gone, one option would be to build up the height of the repro piece with plastic washers.
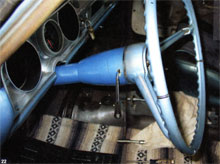 22. With the steering wheel bolted into place, we would’ve had was too much space between the wheel and the column, but John Harrigan, owner of our subject Malibu SS, had a nice trick to take care of that.
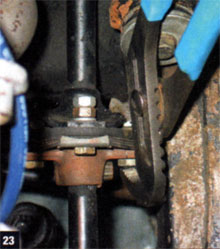 23. Harrigan used a pair of channel locks to compress the rag joint (the pliers are used on the metal only). Besides tightening up the rag joint, this pull compressed the steering-wheel spring, bringing the wheel closer to the column.
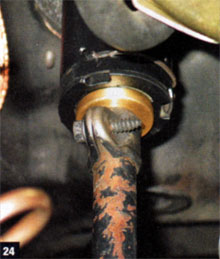 24. With the column now in place, Harrigan reached up to tighten the steering-shaft clamp against the bronze bushing, holding the shaft in place and providing the proper 1/16-inch clearance between the steering wheel and the column. With the adapter clip set in place, we were all but set.
 25. All that was left to replace the lower dash insert, giving us a nice, clean look to go with our cleaned-up column. The rest of this Malibu is still rough, but after just a day’s work we’ve got a properly functioning, tightened-up steering column and working turn signals.